C #. Example of creating a unit test in MS Visual Studio
- Content
- Performance
- 2. Preparation of the Program.cs module text
- 2.2. Make the Program class public
- 3. Listing of the tested program
- 4. Creating a test
- 4.1. Adding a new project to the solution
- 4.2. Solution structure
- 4.3. The text of the file "UnitTest1.cs". Attributes [TestMethod] and [TestClass]
- 4.4. Making changes to the text of the UnitTest1 module. Changing the name of the testing method
- 4.5. Connecting the MinApp project to the TestMinApp project
- 4.6. Making changes to the text of the module UnitTest1.cs
- 4.6.2. TestMin () method text
- 4.7. UnitTest1.cs module text
- 5. Run the test and check the test result
- 6. The result. Interaction between projects
This topic describes the step-by-step process of creating a simple Unit Test in Microsoft Visual Studio 2010 (C #) for an application like Console Application. Using this example, you can learn how to create your own Unit tests. The example also demonstrates the use of the Assert class to test the operation of functions.
Content
The task
For an application like Console Application, develop a Unit test that tests the operation of the Min () function, which determines the maximum element of three numbers.
For the Min () function, set the test method to TestMin (). Check the function.
Performance
1. Create an application using the Console Applicaiton template
Run MS Visual Studio 2010 for execution. To create a project using the Console Application pattern, the following sequence of commands must be called:
File -> New -> Project ...
As a result, the New Project window opens. In the window, select the Console Application template as shown in Figure 1. The template is selected in the Visual C # tab.
Visual C # -> Console Application

Fig. 1. Window "New Project". Choosing an Application of Console Application Type
2. Preparation of the Program.cs module text
2.1. Add Min () function to module text
In the body of the Program class, add the text of the Min () function.
The function is declared as public (static) and public. Min () function text
public static int Min (int a, int b, int c) {int min = a; if (min> b) min = b; if (min> c) min = c; return min; }

Fig. 2. View of the MS Visual Studio 2010 window, module “Program.cs”
2.2. Make the Program class public
In order to have access to the Min () function of the Program class, you need to make this class publicly available. To do this, before declaring a class, you need to define the public keyword.
... namespace MinApp {public class Program {// class methods // ...}} ...
After that, the test program is ready.
3. Listing of the tested program
At the moment, the listing of the program being tested is the following:
using System; using System.Collections.Generic; using System.Linq; using System.Text; namespace MinApp {public class Program {public static int Min (int a, int b, int c) {int min = a; if (min> b) min = b; if (min> c) min = c; return min; } static void Main (string [] args) {Console.WriteLine ("Demo of Unit-testing in C #."); }}}
Since this program will be tested from another testing module, there is no need to enter anything else in the Main () function. Because, in accordance with the condition of the problem, you need to test the operation of the Min () function. And this will be done from the testing module. At the moment, our program is ready for testing.
4. Creating a test
The test is created by a separate project (Project) in the solution (Solution). The program being tested does not know about it. The program that will test (the testing program) will call the functions of the program being tested. In our case, the test program will call the function
int Min (int, int, int);
4.1. Adding a new project to the solution
For this solution (Solution) you need to add a new project using the command
File-> Add-> New Project ...
The window for creating a new project is shown in Figure 3.

Fig. 3. Window for creating a project of the Test Project type
A group of Visual C # templates -> Test is selected in the window. From the displayed templates, the “Test Project” project template is selected. In the field "Name" the name of the project which will test our program is indicated. You need to set, for example, TestMinApp. The project is located in a separate folder "E: \ Test \ MinApp".

Fig. 4. The text of the module UnitTest1.cs. Solution Explorer utility window with TestMinApp and MinApp projects displayed
4.2. Solution structure
As can be seen from Figure 4, the Solution Explorer utility displays the Solution Items structure, which contains two projects:
- project MinApp. This is a project created using the Console Application template with the Min () function that you want to protest;
- TestMinApp project. This project is designed to test the features of the MinApp project. The program code that tests the Min () function will be entered into the UnitTest1 project file of the TestMinApp project.
Both projects can be carried out independently of each other.
4.3. The text of the file "UnitTest1.cs". Attributes [TestMethod] and [TestClass]
In the TestMinApp project, the test file UnitTest1.cs is of primary interest. This file contains methods that will test the functions of the MinApp project. The TestMinApp project can contain any number of files that contain tests (for example, UnitTest2.cs, UnitTest3.cs, etc.).
The listing of the UnitTest1.cs file generated by MS Visual Studio 2010 is as follows:
using System; using System.Text; using System.Collections.Generic; using System.Linq; using Microsoft.VisualStudio.TestTools.UnitTesting; namespace TestMinApp {/// <summary> /// Summary description for UnitTest1 /// </ summary> [TestClass] public class UnitTest1 {public UnitTest1 () {// // TODO: Add constructor logic here //} private TestContext testContextInstance; /// <summary> /// Gets or sets the test context. /// </ summary> public TestContext TestContext {get {return testContextInstance; } set {testContextInstance = value; }} #region Additional test attributes // you can use your tests // // Use ClassInitialize // [ClassInitialize ()] // public static void MyClassInitialize (TestContext testContext) {} // // Use ClassCleanup to run code after all tests in a class have run // [ClassCleanup ()] // public static void MyClassCleanup () {} // // Use TestInitialize to run the code before running each test // [TestInitialize ()] // public void MyTestInitialize () {} // // Use TestCleanup ) {} // #endregion [TestMethod] public void TestMethod1 () {// // TODO: Add test logic here //}}}
As can be seen from the above code, the file contains a class named UnitTest1. The class has a public method called TestMethod1 (). Before implementing the TestMethod1 () method, the [TestMethod] attribute is placed. This means that you need to enter the code that will test the functions of the MinApp project in the body of the method.
In the class, you can enter any number of methods that will test different functions from different modules. The main thing is that these methods are marked with the [TestMethod] attribute.
4.4. Making changes to the text of the UnitTest1 module. Changing the name of the testing method
You can change the names of methods and add new methods that are marked with the [TestMethod] attribute in the UnitTest1.cs module. Considering this, the TestMethod1 () method in the text of the UnitTest1.cs module should be renamed to TestMin ().
After the changes made, the abbreviated text of the module of the UnitTest1.cs file will be:
using System; using System.Text; using System.Collections.Generic; using System.Linq; using Microsoft.VisualStudio.TestTools.UnitTesting; namespace TestMinApp {/// <summary> /// Summary description for UnitTest1 /// </ summary> [TestClass] public class UnitTest1 {... [TestMethod] public void TestMin () {// // TODO: Add test logic here //}}}
4.5. Connecting the MinApp project to the TestMinApp project
To have access to the Min () function (MinApp project) from the TestMinApp project, you need to connect the namespace in which this function is located.
To do this, first of all, you need to call the context menu for the TestMinApp project. Then in the context menu you need to call the command “Add Reference ...” (Figure 5).

Fig. 5. Team “Add Referencse ...”
As a result, the Add Reference window will open, in which you need to select the MinApp project.

Fig. 6. Window "Add Reference". Connecting the project MinApp
After the completed actions, the MinApp project functions will be available for use in the TestMinApp project.
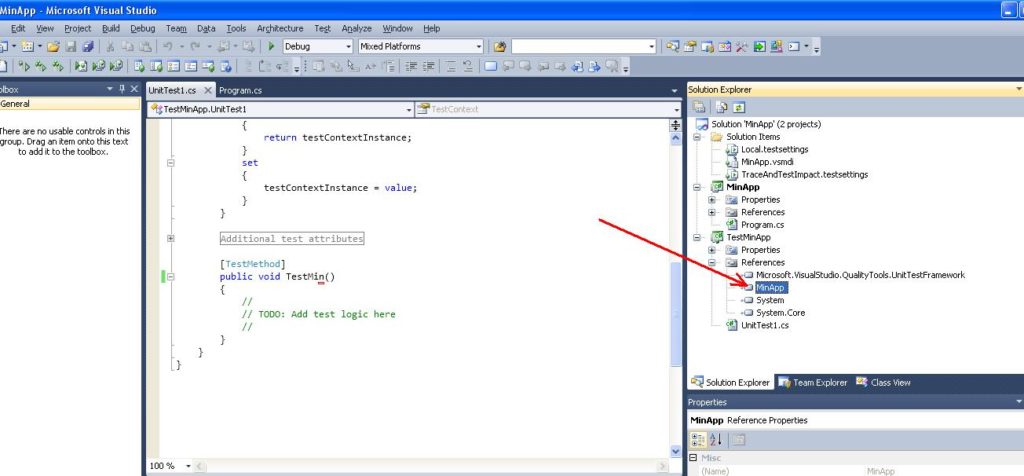
Fig. 7. References tab with connected MinApp project
4.6. Making changes to the text of the module UnitTest1.cs
4.6.1. Adding the MinApp namespace to the UnitTest1.cs module
At this step, in the UnitTest1.cs module, you need to add the MinApp namespace using the using directive:
using System; using System.Text; using System.Collections.Generic; using System.Linq; using Microsoft.VisualStudio.TestTools.UnitTesting; using MinApp; namespace TestMinApp {...}
4.6.2. TestMin () method text
In the text of the TestMin () method, enter the following code:
... [TestMethod] public void TestMin () {// // TODO: Add test logic here // int min; min = Program .Min (3, 4, 5); Assert .AreEqual (2, min); } ...
4.7. UnitTest1.cs module text
The text of the entire UnitTest1.cs module is as follows:
using System; using System.Text; using System.Collections.Generic; using System.Linq; using Microsoft.VisualStudio.TestTools.UnitTesting; using MinApp; namespace TestMinApp {/// <summary> /// Summary description for UnitTest1 /// </ summary> [TestClass] public class UnitTest1 {public UnitTest1 () {// // TODO: Add constructor logic here //} private TestContext testContextInstance; /// <summary> /// Gets or sets the test context. /// </ summary> public TestContext TestContext {get {return testContextInstance; } set {testContextInstance = value; }} #region Additional test attributes // you can use your tests // // Use ClassInitialize // [ClassInitialize ()] // public static void MyClassInitialize (TestContext testContext) {} // // Use ClassCleanup to run code after all tests in a class have run // [ClassCleanup ()] // public static void MyClassCleanup () {} // // Use TestInitialize to run the code before running each test // [TestInitialize ()] // public void MyTestInitialize () {} // // Use TestCleanup ) {} // #endregion [TestMethod] public void TestMin () {// // TODO: Add test logic here // int min; min = Program .Min (3, 4, 5); Assert .AreEqual (2, min); }}}
5. Run the test and check the test result
In Microsoft Visual Studio 2010, a special menu of commands called Test is implemented for working with Unit tests.
To run an execution test, select one of the commands.
Test -> Run -> Tests in Current Contextor
Test -> Run -> All Tests in Solution
as shown in Figure 8.

Fig. 8. Call the start test command and view the result.
After running the test, the result can be viewed at the bottom of the Test Results window. As can be seen from the figure, the test is not passed. This is logical, since in the Assert.AreEqual () function we compare the numbers 2 and 3, which are different. Here, the number 2 is specially introduced instead of 3.
If instead of number 2 you enter the correct answer - number 3 (minimum between 3, 4, 5), then the test will be passed (Figure 9). In this case, the text of the TestMin () method will be as follows:
... [TestMethod] public void TestMin () {// // TODO: Add test logic here // int min; min = Program .Min (3, 4, 5); Assert .AreEqual (3, min); } ...
The result window is shown in Figure 9.

Fig. 9. Test result for the case, if you enter the correct answer
Now we can conclude that the Min () function for this case works correctly.
6. The result. Interaction between projects
In this paper, two projects are formed in the solution. One MinApp project contains the Min () function that you want to test. The second project TestMinApp contains testing methods.
In Microsoft Visual Studio 2010, each project is launched using different menu commands. So, the MinApp project is launched in the standard way from the Run menu. And the TestMinApp project is launched from the special Test menu.