Wifi access point windows 7 on laptop. How to make a laptop wifi access point
- For Windows XP
- For Windows 7
- For Windows 8.0 and Windows 8.1
- Video lessons
- general information
- Built-in features
- Command line
- Comp-comp connection
- Programs
- How to choose an application
- Distribution Setup
In this article you will find tips on how to create a dot from a laptop. wifi access That will allow to share the Internet for a room or at home. Such a system will be convenient if you want to have a party, a conference, and also facilitate the way to install the network without using network cables.
Below we consider the methods and techniques for the most popular operating systems among users. To create such a point, you need a laptop that has Internet settings, and also has an adapter with the ability to provide wi-fi. Among the advantages that arise from such a connection, you can call accessibility and mobility. With the connected wi-fi point, you can easily use tablets, other laptops, while in another room, sitting on a comfortable sofa or bed.
For Windows XP
1) Open the "Start" menu and go through the "Control Panel" in the "Network Connections"
2) Next, you need to turn on Wi-Fi, for this you need to double-click (left button on the mouse) on the icon "Wireless Network Connection". After that we click on the icon, open the context menu window and click on “Properties” in it. In the new window, select the “Wireless Networks” tab and tick the “Use Windows to configure the network” box. At the end click “Add”.
3) In the window that opens, you need to drive in the desired, new name for your connection (for example, Home or otherwise). We continue to configure the rest of the network settings:
- Set the "dot" in front of the item "Connects even if it does not broadcast."
- "Authentication" set it open.
- To encrypt data, select "WEP".
- "Network key", set the value to 13 or 5 characters.
- Remove the mark from the item that reports the provision of a key in automatic mode.
- We specify the key index as "1".
- Open the tab "Connection" and put only one tick.
- At the end, click "OK".
4) In the settings of the wireless network connection, open the "General" tab and check "Protocol (TCP / IP)", then go to the properties of this item. In the opened window, tick the item “Use the following IP-address” and then fill in the following fields:
- In the line with the IP-address and prescribe "192.168.0.1"
- In the line that is responsible for the subnet mask write "255.255.255.0"
- And in the column indicating the DNS server we enter - "192.168.0.1"
- Confirm everything, click "OK", and exit. Now your laptop works as a router for Wi-Fi.
For Windows 7
For creating Wi-Fi point on a laptop with such an OS, you can use the firmware or download special software.
1) Method with built-in tools:
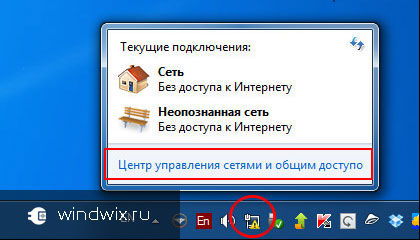
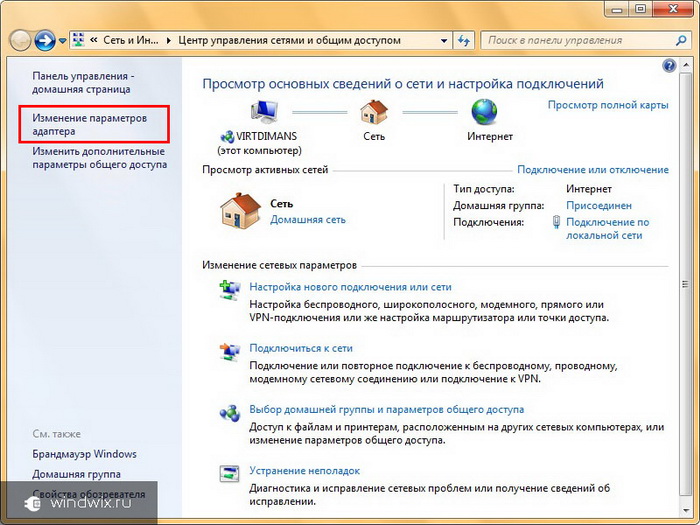
- Open the "Network and Sharing Center", for this you can click on the icon at the bottom right of the panel.
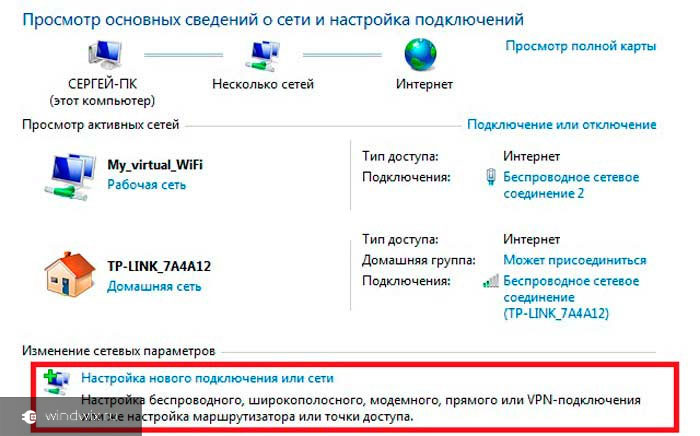
- In the menu that opens, click on "Setting up a new connection or network," and then - "Setting up wireless network computer-to-computer. "
- Click on the button "Next" and create a new connection. Specify the name of the created network, the password for access and select the system for security (it is best to choose WPA2-Personal).
2) Use a special program.
Today, there are a huge number of programs that allow you to reconfigure your laptop computer and make it work "in mode" of the router. One of the best in this business can be considered "Connectify Hot Spot Pro", it is the simplest. In order to customize with her using wifi you need to install it, run it, and then enter in the appropriate boxes: “Network name”, “Password” and “Network adapter” used for Wi-Fi.
For Windows 8.0 and Windows 8.1
In these versions of the OS, developers continued the trend of previous versions and included the ability to create and connect using built-in features. About them we will tell you:
- Check the performance network adapter , the indicator should be on.
- Open the menu using a combination of buttons "Win" and "X". In the menu, click "Command Line".
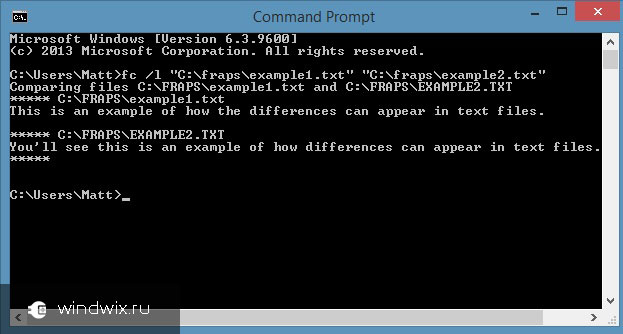
- Fit in command line command: "netsh wlan show drivers".
- Find the item "Hosted Network Support" for correct work The connection should be “Yes”.
- Now we enter the commands that specify the name of the connection and the password to it: “netsh wlan set hostednetwork mode = allow ssid =" Name of your network "key =" password for it "”.
- After executing the command, you need to enable the dot, we enter a new command from the keyboard for the program: “netsh wlan start hostednetwork”. If you want to see connection properties, type in: "netsh wlan show hostednetwork"
- Now you need to allow access to the Internet to other users who will use your connection. Open "Network Connections" and press the key combination "R" with "Win". In the new window, in the graph we type the command ncpa.cpl and click "ok."
- The “Network Connections” window has opened, a new icon with our point for connection has appeared in the folder. Click on the icon, which is responsible for your connection to the Internet and in the menu window open “Properties”. In the menu, go to the tab "Access" and mark "dot" "Allow other users to use the Internet connection of this computer." In the appeared list we search for the Wi-Fi point made by us and confirm (by clicking “ok”).
Video lessons
Good day, blog visitors.
Even today, many computer users cannot imagine their life without the Internet. And now he is not only on computers, but also smartphones, tablets, TVs. Wireless technologies are becoming more and more popular, and this mainly concerns getting the opportunity to get into the “world web” anywhere in the room. Special devices perfectly cope with this task. But what if such equipment is not provided? Further in the article I will tell how the point is organized. wifi access Windows 7 on a laptop in various ways.
general information
Wi-Fi technology provides the ability for all users to combine several computers and additional peripheral devices into home groups. This allows you to increase the speed of information transfer, speed up communication, improve workflow.
Basically, such a system is organized by means of special equipment - a router. But this device is not always at hand. And what if you urgently need to establish a connection with a new component or open access to the Internet? Fortunately, all modern laptops have built-in Wi-Fi adapter . This element can be configured as a wireless communication module.
For this there are many programs. In addition, in the operating system There are some tools to accomplish this.
Built-in features
Immediately it should be said that this method does not require users to install any additional software.
This method will help get a router without a router. wireless point Access - it will be configured on the laptop. In this case, the device, as distributes, and receives a signal.
And the first thing to check for this is the drivers for the module we need. They should be the latest version. If this is not the case, the function we need may not be supported at the software level.
Distribution of the Internet can be organized via the command line or using the “comp-comp” connection. In any case, the result will be the same.
The main thing is to perform everything step by step so as not to miss something.
Command line
To achieve the desired result, you need to perform a number of actions:
In some cases, users may need to share information. To do this, perform the following:
If you suddenly get a limited connection, and you need to configure the Internet for all participants, you need to do a few movements:
Now the access point is designed not only for computers or laptops, but also for phones and tablets.
Comp-comp connection
The procedure itself is simple. To do this, perform the following:
If the device does not distribute the Internet after this, a reboot of the equipment may help. If not, check the settings.
Programs
This method can be called one of the easiest. To do this, there are many applications that are downloaded for free. In general, work in such programs comes down to four main actions:
- Enter the name.
- The choice of security.
- Enter key.
- The choice of connections for access to the "global network".
It is worth noting that if you conceived a similar turn with a stationary computer, it must have the appropriate components. For example, the usual network card will not work. Conceived it will turn out to implement through a USB-modem connected to an external port.
I hope you can easily achieve your goal. Subscribe and you will always know what to do with your computer in any situation.
Nowadays you won't surprise anyone with wireless networks: there is a Wi-Fi access point in almost every home, and we successfully use this technology for our own purposes every day. And if there are moments when there is no router at hand, you can distribute the network from the laptop. Here we will analyze what programs are available for distributing Wi-Fi from a laptop with Windows 7. Thanks to this software, you can easily turn your computer into a real router.
There are many ways to distribute a network from a laptop:
Next, it will be about the third paragraph - what programs are there for distributing Wi-Fi from a laptop with Windows 7. There are a lot of similar applications. Of course, they differ among themselves by different properties, ways of PC settings and so on.
Some programs require administrative rights, others do not. However, they work according to a similar principle and use the same resources. Another quality that combines all such programs for the distribution of Wi-Fi with Windows 7, is the ease of configuration and use.
As a rule, the whole setup is reduced to several steps:
- Assign a network name.
- Specify security password.
- Select an active internet connection.
- Click the button to start working - “Start sharing”.
How to choose an application
As mentioned above, this software on the Internet is full. However, we will highlight a few that have already been tested and have repeatedly shown the stability of work:
- Connectify.
- Switch Virtual Router - runs on Windows XP and 7.
- mHotspot.
Differences between these programs is an additional set of functions. For example, mHotspot allows you to track the number of connected devices, spent traffic and has quite flexible settings.
The special feature of Switch Virtual Router is that it can also be used for Windows XP, while it also has many settings and a fairly wide range of functions, one of the most convenient is the ability to automatically start the program when Windows starts.
What program for distributing Wi-Fi on Windows 7 will be most convenient in a given situation - you decide, given their requirements. In my opinion, Virtual Router Plus is the easiest utility for a computer; it does not change the system configuration and does not reconfigure the network. Virtual Router Plus is safe and simple, not overloaded with unnecessary features that only slow down work.
In fact, Virtual Router Plus simply configures the distribution on the command line, automatically executing two commands — to create a distribution and to launch virtual network . Expressing my subjective opinion, I can say that I prefer simplicity without excesses, and therefore I prefer this particular program. You can use any of the proposed utilities. They are configured almost the same (if not to talk about additional features).
Distribution Setup
So, you already know a short list of the most popular and stable utilities. Now let's look at how Wi-Fi distribution is configured with Windows 7: Virtual Router Plus will be taken as an example.
So, I’ll say right away that you can download an installation file or a portable version of a program that you don’t even need to install. So, after you have started the program, you need to follow a few simple steps:
- In the line "Network name (SSID)" you need to write the name of the network being created. This name will be displayed when searching for an access point, and you will need to connect to it. In fact, this is the name of your virtual router.
- Password - in this line you specify the security password. It will need to be entered when connecting to a virtual network.
- Shared connection - here you need to specify an active connection to the Internet. As a rule, the program itself automatically determines the necessary connection, but if this does not happen, then click the “Refresh” button (it has the designation in the form of two arrows opposite to each other).
And what if you urgently need to establish a connection with a new component or open access to the Internet?